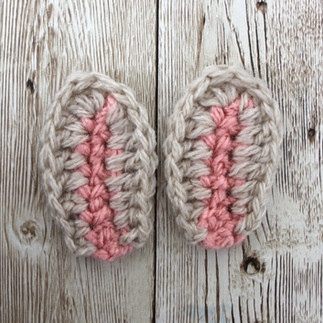
All book lovers, listen up! This crochet pattern is for you! How many times have you used any old scrap of paper to mark a page? How many times have you put your book down, picked it back up, realised that you've lost your page and then had to sit there in frustration as you try to find it again? As a bookworm myself, I can completely relate to this. That is why I thought it was high time that I designed a crocheted bookmark... and a super cute one at that. Because - if I do say so myself - this bookmark is unbelievably cute. Plus, it is super easy and quick to make.
So, lets get started...
Materials:
3mm crochet hook
A DK yarn of your choice in light brown and pink (you could, alternatively, use grey or white instead of brown).
Scissors
A darning needle
A small white pompom (optional)
Stitch Abbreviations:
dc: double crochet
htr: half treble crochet
tr: treble crochet
dtr: double treble crochet
sl st: slip stitch
Pattern Notes:
This pattern is worked in UK terms. You can find my post explaining the difference between US and UK crochet terms here.
The chain 1 at the beginning of each round does not count as a stitch.
We begin by making each ear separately and then join them together to create the rest of the book mark.
Find the video tutorial here!
Method:
Round 1:
With your pink yarn, chain 8.
Starting in the 2nd chain from your hook, make 1 dc in each stitch down (7 stitches in total).
Fasten off and cut your yarn.

Round 2:
Attach your brown yarn to the bottom right side of your chain.
Chain 1, and make 1 dc in the same stitch.
Working up the side of your pink chain, make 1htr in the next 2 stitches. Make 1 tr in the next 3 stitches. Make 2 tr in the next stitch.
In the next stitch, make 1 tr, 1dtr, 1 tr (this stitch is at the top of the ear).
Working down the other side, make 2tr in the next stitch, 1 tr in the next 3 stitches, 1htr in the next stitch, and 1 dc in the last stitch.
Fasten off and cut your yarn.
Repeat steps 1 and 2 to create the other ear. Once you have done this, sew in any ends that you have.
Joining the two ears together:
Round 1:
Begin by taking one of your ears. Attach your brown yarn to the bottom corner and then chain 1.
Make 4dc along the bottom of the ear.
Chain 1.
Working into your second ear, make 4dc along the bottom.
Chain 1 (does not count as a stitch) and turn your work.

Round 2:
Make 1dc in the first 3 stitches.
In the 4th stitch, make 1 decrease (skipping over your ch 1 in between the two ears).
Make 1dc in the last 3 stitches.
Ch 1 and turn your work.

Round 3:
Make 1dc in each stitch across (7 dc in total).
Chain 1 and turn your work.
Round 4 - 35:
Make 1htr in each stitch across (you will have 7htr in total).
Chain 1 and turn.
Fasten off, cut your yarn, and sew in any ends.
Optional Step:
Create a pompom using a yarn of your choice.
Take your pompom and sew it to the end of your bookmark.

And there you are! You now have a super cute bunny ears bookmark! If you liked this super quick tutorial, make sure you subscribe to our monthly newsletter so that you never miss out on a new, free crochet pattern.
Don't forget to Pin this pattern!


Comments